Seasonal Management - The Honey Harvest
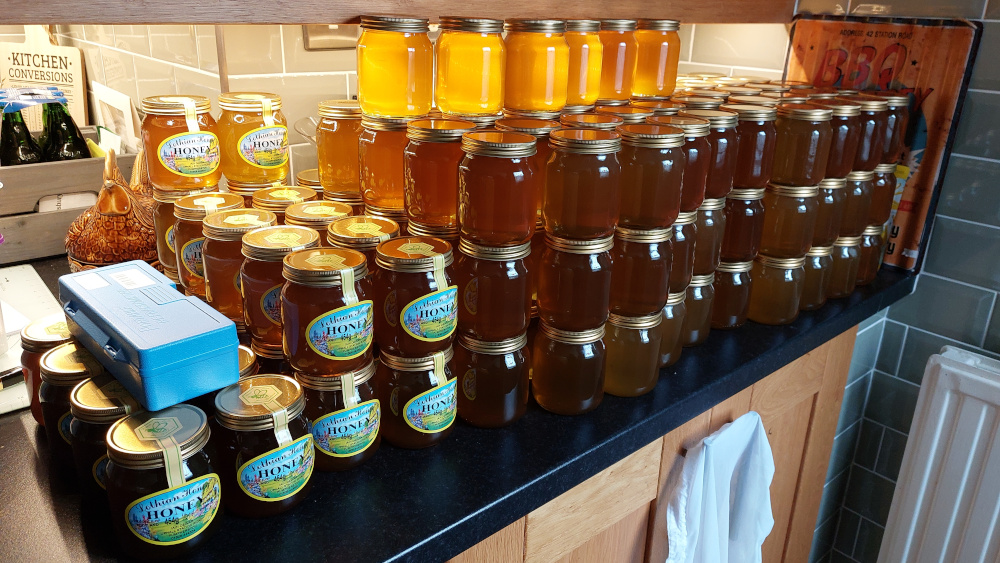
With any luck, weather and bees permitting, you might just be able to harvest some of the season's bounty. All going well, this will be a little reward for all your efforts, trials and tribulations - beautiful, aromatic and flavoursome honey that will be warmly received by family and friends with great delight, and maybe if you are lucky there will be some to spare to sell on in your local shop or garden centre. Pure honey, as the bees make it, contains so much goodness making it very desirable, so much so that there are a lot of counterfeit substances in circulation claiming to be 'Honey' found on sale throughout the market place. What you will produce from your hives will be 100% the real McCoy!
When to harvest
The two significant flowering seasons in the beekeeping calendar when honey is produced are spring and summer. It's at the end of these two seasons that we can consider harvesting the surplus honey. Spring is the most productive season for the bees and it is also the busiest for the beekeeper. It's normally over by the beginning of July and the bees are generally in good humour which is always advantageous when opening up hives. The spring and summer seasons don't however flow seamlessly together, there is a period between the two when the spring flowers are dying back and the summer flowers are just getting going leaving a dearth of pollen and nectar, so care has to be taken when deciding how much of the spring crop can be taken off. The summer crop, if there is one, will be significantly less than the spring crop by the start of autumn when thoughts of winter preparations are not so far away. Bees sense the changing seasons and the sudden lack of forage at the end of summer makes them tetchy and will guard their late honey stores quite aggressively. Between the changing seasons and everything else there are varroa treatments to fit in and honey that has been exposed to these treatments can not be harvested for human consumption.
How much is too much?
The anticipation of of how much honey your bees have produced always raises expectations however it's advisable to avoid getting too carried away with your harvest, removing what is essentially the bees only hard earned food reserves. It takes the colony much time and work to collect the nectar needed to produce the honey and store it hermetically sealed in enough quantity ready for use throughout the rest of the summer and autumn, and through the winter. They need access to their own food continually, 24 hours a day, all 365 days of the year come rain or shine, and the uncanny short amount of time it takes for honeybees to die en masse from starvation at any time of the year is alarming to say the least. Consideration must be given to this, at what point you are in the beekeeping the season and how much, if any, the bees can afford to let you have. Whether it is spring or summer honey you are harvesting, it is without doubt most beneficial to you and your bees to only take a percentage of the crop. We can't accurately predict the weather which can turn bad quickly keeping bees in the hive for days on end. This is when they need a good food supply, especially a hive with a strong colony of hard working bees with slabs of brood to feed, they can and will consume stores quicker than you might think. Supplementing harvested stores with syrup or fondant is a consideration and will certainly keep the colony alive but artificial feeds do not contain the natural goodness of honey necessary to maintaining their health and productivity, and the development of healthy larvae. Honey is a complex blend of many organic and inorganic compounds including proteins, enzymes, organic acids, sugars, pigments, minerals, and many other elements derived from the nectar and pollen gathered by the bees from a wide range of plant species. Sustaining healthy and productive colonies is infinitely more important than harvesting the maximum amount honey from your colonies. In a poor season leaving what honey crop there is to the bees is a wise choice, a healthy colony means there will always be a next year!
Planning to harvest
Having given the foregoing points due consideration and where there is enough surplus honey to allow a harvest, it's time to plan how you are going to do it. An easy enough task you may think but it is not without it's risks and hazards. Supers full of honey can weigh heavily, up to 30 lbs each (15 kg) or more, and will also be full of bees who won't appreciate you removing all their hard work, then you have to get it into the back of the car if it's from an out apiary. It's always advantageous to have an extra pair of hands to help lift full supers off, where this is not possible you might like to consider an alternative method to make the job easier and safer. Consider your own physicality, what is realistically safe for you to lift and carry, and assess your ease of access, the position and height of the supers, and where they are to end up e.g. in the boot of your car rather than scattered on the ground as you wrestle with the rest of the hive, angry bees, twisted ankles and pulled muscles! Even a half full super is a significant weight for the average healthy middle aged person to lift off the hive. Using mechanical aids such as a sack or wheel barrow is recommended where there is distance between the hive and the destination of the honey filled supers. Think it all through beforehand, preparation and planning always pays!
Harvest procedure
With your plan in mind the first thing to do is clear the bees from supers to be harvested. This involves putting a one way gate system in place between the supers to be harvested and the rest of the hive which allows bees down and out of the supers into the brood box below without allowing them to return. There are a great many clearer devices to chose from, some simple, some not, and some more efficient than others. Clearer boards with the one way device installed is preferential than trying to fit devices into crown boards already in place on the hive with bees everywhere. Ideally the clearer boards should be put in place late in the afternoon, left overnight and the supers removed in the morning. With luck on your side the bees in the supers will have gone down overnight into the brood box and if the device has worked there should be little or no bees in the supers above. Most times this works and any remaining individuals can be shaken off away from the hive. Full supers should be covered over in the back of the car to avoid strays flying around and distracting you while driving. This method when carried out correctly clears the bees efficiently from the supers with the least difficulty and without stressing the colony unduly.
Harvest procedure plan B!
If it's the case that even a half full super is too heavy to be easily removed, an alternative is to remove individual capped honey frames one at a time from the supers, shaking the bees off before transferring the frame to a waiting empty super away from the hive. Again a second pair of hands is advantageous for carrying away the frames while you remove them. This method involves more work and is more time consuming but is safer than over stretching your abilities and causing injury. It can be done throughout the season removing a couple of filled frames each visit if necessary.
Ensure quality
Once the filled supers are off, take a little time to sort them. Frames with uncapped cells with honey in them means the honey is not ready yet to be capped. Bees only cap cells when they are happy it is of the correct quality and that the moisture content has been reduced to a level where it won't ferment (less than 20%). There is no point in taking these back for extraction as they won't keep any length of time, and they will compromise the quality of the rest of your honey and may even start to ferment. Remove these frames and return them to the hive for the bees to continue working on. Extracted honey should normally be around 18% moisture content, this can be easily checked using a honey refractometer.
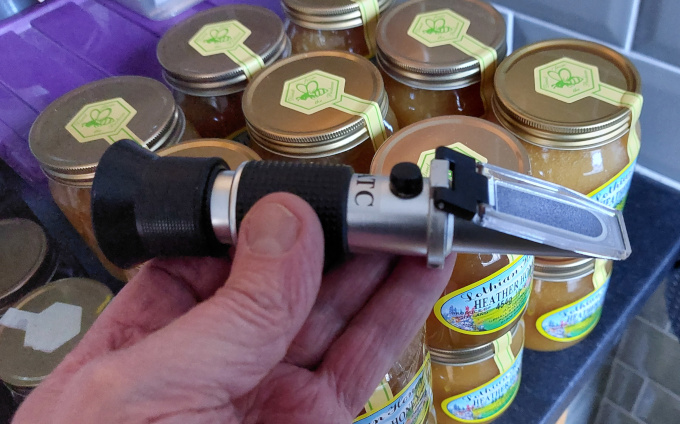
Honey Refractometer - a relatively inexpensive and easy to use tool for accurately measuring the moisture content of honey. Re-calibrate each time using the appropriate calibration fluid. Only use a 'Honey' refractometer, other types are not suitable.
Storing filled supers
Now that you have removed the filled supers from your hives they can be stored until you are ready to extract. Keep them in a dry environment, ideally indoors, and suitably covered to stop any moisture or unwanted visitors getting in. Bear in mind that unsealed honey will draw in moisture and eventually begin to ferment. Bees and wasps can smell the honey from a great distance and will want to rob the unguarded stores. Walking into a hut or garage full of hungry bees or wasps trying to get to your honey, especially without your bee suit on isn't a pleasant experience. Stored safely they will remain in good condition for extraction later but be aware that any frames with Oil Seed Rape Honey will crystallise very quickly and is best extracted as soon as its taken off. If it does set it can still be processed but will requires a different process for extraction as described below.
From frame to jar
Extracting the honey from the frames is ideally carried out soon after harvesting, although it's not a disaster if you don't. There can be many reasons why you can't do it right away and, if its capped over, it will keep well for months in a suitable environment as described above, even through the winter months. The consistency of honey is naturally thick at normal room temperatures of around 18-20℃ but will thicken as it gets colder and conversely get thinner as temperatures rise. It follows that it is easier to extract warm honey than cold, and it makes sense to extract during the summer months rather than winter, if even just for lower heating bills. An important point to remember when warming supers for extraction is that as much as the warmth makes the honey easier to extract, too much warmth will soften the wax comb making it prone to collapse in the extractor or onto the floor.
Small scale extraction
If you only have a couple of hives you might consider using the 'extracting crystallised honey' process described below which is relatively simple and requires no costly extractor. It also means you can and should use un-wired foundation when preparing honey super frames.
Extractors
Using a centrifugal extractor is a popular and convenient way to extract honey. Extractors come in various forms, floor standing, table top, manually powered, electrically powered, manually controlled, electronically controlled, made from food grade plastics/polythenes or from stainless steel. Old galvanised extractors are prone to corrosion and are unhygienic and not recommend. Extractors come in different types and sizes and can take anything from two to forty plus frames at a time which are either mounted radially (frames lie on their side with bottom edge innermost and top edge outermost, extracts both sides at once), or tangentially (frames are mounted on their bottom edge with one frame side facing outwards, extracts one side at a time).
Preparing for centrifugal extraction
The frames of honey are prepared for extraction by pre-heating them in their supers in a warming cabinet or other warming device to around 26℃ which makes the honey run free enough without softening the wax comb so much that it collapses while spinning. It usually takes around 24 hours of gentle heating to prepare them thoroughly, once suitably warmed an un-capping tool or knife is used to remove or break open the outer cappings over a clean honey pail or container to catch the cappings and any spilled honey. The frames are then mounted in the extractor and spun at the recommended speed, usually slower at first then building up in one direction then similarly in the other direction. The extracted honey runs down the inside edge of the extractor and collects in the bottom of the vessel and then it is a simple job of opening the gate valve and running the honey into a honey bucket ready to be put through a honey strainer. Spinning the honey out with these extractors is a bit of a skill which you get better at the more you do, you quickly learn the ideal temperature and speed required for efficient extraction.
Extracting crystallised honey
Crystallised honey such as Oil seed Rape is a little more tricky to extract. It tends to set solid in the comb within a couple of weeks after it's capped over, and the temperatures needed to make it runny also renders the wax too soft to be handled, and is impossible to spin out using an extractor as previously described. For crystallised OSR the whole wax comb has to be cut out of the frame and placed in a honey bucket, lightly crushing it down as you go. The bucket should be placed in your warming cabinet and the thermostat turned up to between 36-38℃ and left for 24-48 hours when the honey will have liquidised and the wax softened sufficiently to separate and float as a solid on top of the honey. This can now be poured, wax and all, straight through a fine honey filter bag. Once the honey has filtered through, the wax is very easily recovered from the cloth filter by firstly flushing out honey residue with cold water, the remaining wax then comes off the filter bag easily. The runny honey will be perfect for jarring but bear in mind it will set solid again in due course and is better turned into Soft Set as described below.
Heather honey
Heather honey also sets fairly solid in the comb, however it is thixotropic rather than crystallised, meaning it sets to a gelatinous consistency in the comb and can be returned to its liquid state by shaking or stirring, which is not a practical option without specialist equipment. Cutting the entire comb out if you are using unwired foundation, or scraping out with a Smith Combined Cutter-Scraper (or similar) if using wired foundation, then crushing in a Honey Press is the normal procedure for extracting heather honey. The honey is best jarred directly as it runs out of the press rather than transferring from a bucket later.
It has a strong and distinct flavour, not always to everyone's taste, and has a shorter shelf life due to it's moisture content being higher than normal blossom honey, giving it a tendency to ferment, swelling and leaking out of the jar. For this reason heather honey is best kept in a cool environment. Fermenting heather honey will have a beer-like smell and will lose it's distinct flavour but still be very usable in cooking and baking. It is often mixed with OSR to produce a milder flavoured honey which also extends it's shelf life to around 6 to 9 months.
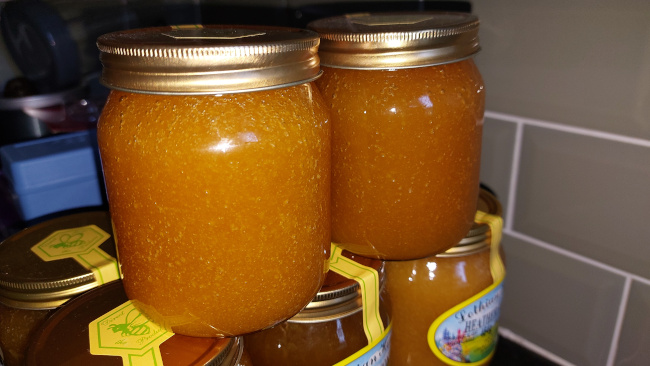
Heather Honey has a strong flavour. The pressing process used to extract heather honey results in air bubbles which are retained as the honey re-sets in the jar, giving it a distinctive look. Keep it cool!
Cut Comb
Cutting chunks of complete comb from the frame is an alternative way to present honey for sale and is ideal method for Heather Honey. Chunks can only be cut from frames with unwired foundation, plan ahead for this so that supers contain the correct foundation, and only cut areas of completely capped honey. As the depth of capped honeycomb varies it will be necessary to either individually price containers, or to adjust the content to reflect the labelled net weight.
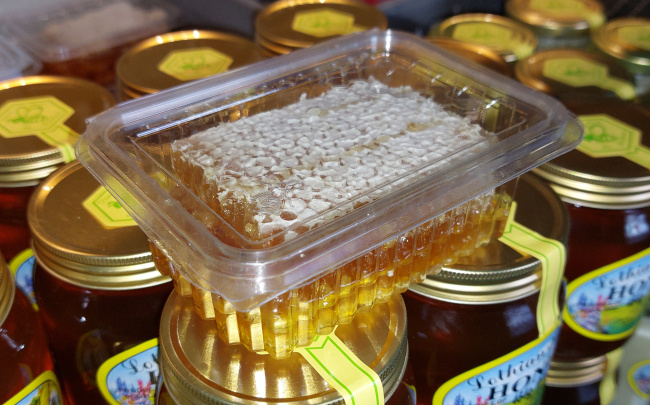
Cut comb honey is an alternative to extracted and filtered honey. Frames must be prepared with un-wired foundation in order to allow comb cutting.
Soft set honey
Soft Set Honey is an alternative way to present honey, it is exactly the same as clear honey and needs no extra ingredients to produce. All pure honey will crystallise (granulate) through time, it's a sign of it's purity, however OSR granulates very quickly with large size crystals that lock together setting it into a solid mass which is hard to use, and is best processed as 'Soft Set'. The process is straight forward and involves the use of a 'seed' to persuade the honey to granulate with small size crystals into a fine consistency giving it a soft and creamy texture while retaining all the pure honey goodness. Once created it remains in it's soft set condition and has a good shelf life.
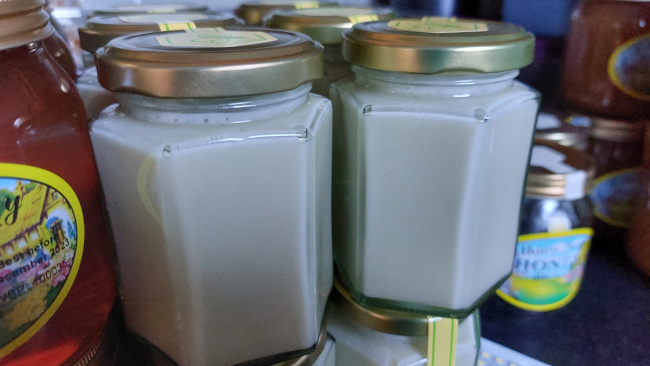
Soft set OSR honey looks quite different once it has been encouraged to set with a creamy consistency. Golden when liquid but shades of white to light grey one processed.
Create your 'soft set' by warming your extracted and filtered OSR honey to 26℃ or so for 24 hours until thoroughly liquefied, being careful not to overheat it. Pour it into a bucket and allow it to cool. Add some of your 'seed' using a ratio of between 20:1 and 10:1 (5% - 10%), gently stirring the seed through as you go. Even and thorough dispersal of the 'seed' through the mix is essential in getting the best final results. Place the finished mix in a cool environment and stir a couple of times a day until it crystallises and reaches the desired consistency. There are purpose designed manual plunger tools available from your favourite supplier, or alternatively you can use a stainless steel paint mixer paddle on your cordless drill. Mix slowly, being careful not to mix too much air in (although it's inevitable you'll get some air bubbles!). As the mix starts to crystallise it will become thicker and more difficult to stir until after a few days it will end up soft and creamy and ready to jar.
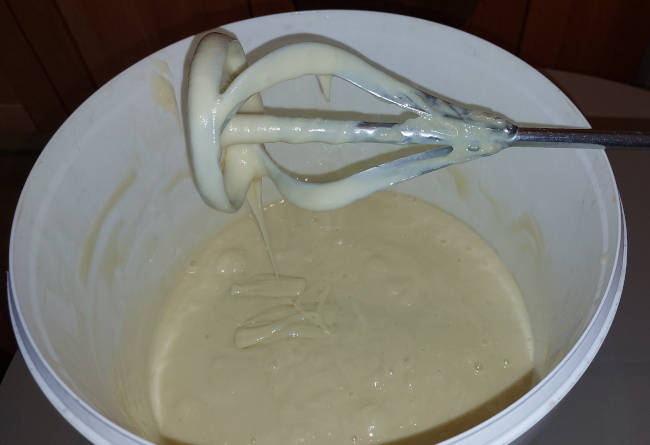
A paint mixing paddle and cordless drill makes lighter work of soft set honey. The honey bucket has to be held secure while the mixing paddle does it's work, especially as the honey starts to crystallise. Keeping the speed down avoids too many air bubbles.
Soft Set 'Seed' - you can create your own batch of 'seed' by taking a quantity of already crystallised honey such as OSR and grinding it in a pestle and mortar, rendering it down to the required soft creamy texture. The once larger crystals are ground down to a much smaller size which, when mixed with liquid honey as previously described, will encourage growth of similarly small crystals creating soft set honey. This will retain it's soft set nature, and can be gently warmed to make it easier for jarring. If you are not confident about making your own seed, you can buy a jar of soft set honey from a beekeeping colleague to make your first lot, from which you can retain some as seed for your next batch.
Jarred and labelled
Once the honey is extracted and filtered it can be stored in sealed honey buckets, or immediately jarred and labelled while it is still reasonably warm. If it is to be stored the containers should be clearly marked with details of the contents. It will require re-warming again later before jarring otherwise it will be a long and very slow process. If it has set in the container (as OSR is prone to do) it will need to warmed up to 36-38℃ to re-liquefy it.
Jars and labels can be purchased from your local beekeeping supply shop, from a wholesaler, or ordered online. Use only sterile honey jars and lids. Returned jars can be re-used after sterilisation but used lids should always be discarded and replaced with new ones. Jars should be filled to their declared weight, some honey jars have a guide line at the top just below the screw thread to indicate the correct level, always check. Filled jars should then have a tamper seal attached before labelling, which need not be too complicated if you only intend you jars to go to your family and friends, but if you intend to sell to a retailer or the public they must have the required information clearly marked.
Click here for a BBKA leaflet on the legalities of selling honey.
Try the Colony Management Quiz
About the 'My Beekeeping Kit' website.
Contact Iain Dewar for enquiries, suggestions, corrections and contributions for improving the notes. Always welcome!